The return to partial or 100% in-person events is exciting and a bold reminder of the attention to detail that creates a flawless event.
The guest experience at your fundraising events is critically important to your brand, the future of the event and ultimately your financial success. Events are stressful because they are the most visible example of your work and in most cases it’s the only work product that a donor witnesses.
Let’s dust off your event organization skills and it starts with Check-In!
Steps to a smooth, fast and flawless check-in station
Registration
A smooth check-in process starts with correct and easy-to-access guest information.
For nonprofits, this is actually more difficult than a rock concert because nonprofits issue tickets in many ways: (1) Paid, (2) Discounted, (3) Complimentary, (4) By Invitation of a Table Host or Sponsor and (5) Packages.
Select technology or create internal processes that ensure you can gather the names and email addresses (at least) of every single guest attending. Choosing a robust registration system can save you HOURS of time and be an incredible fundraising tool.
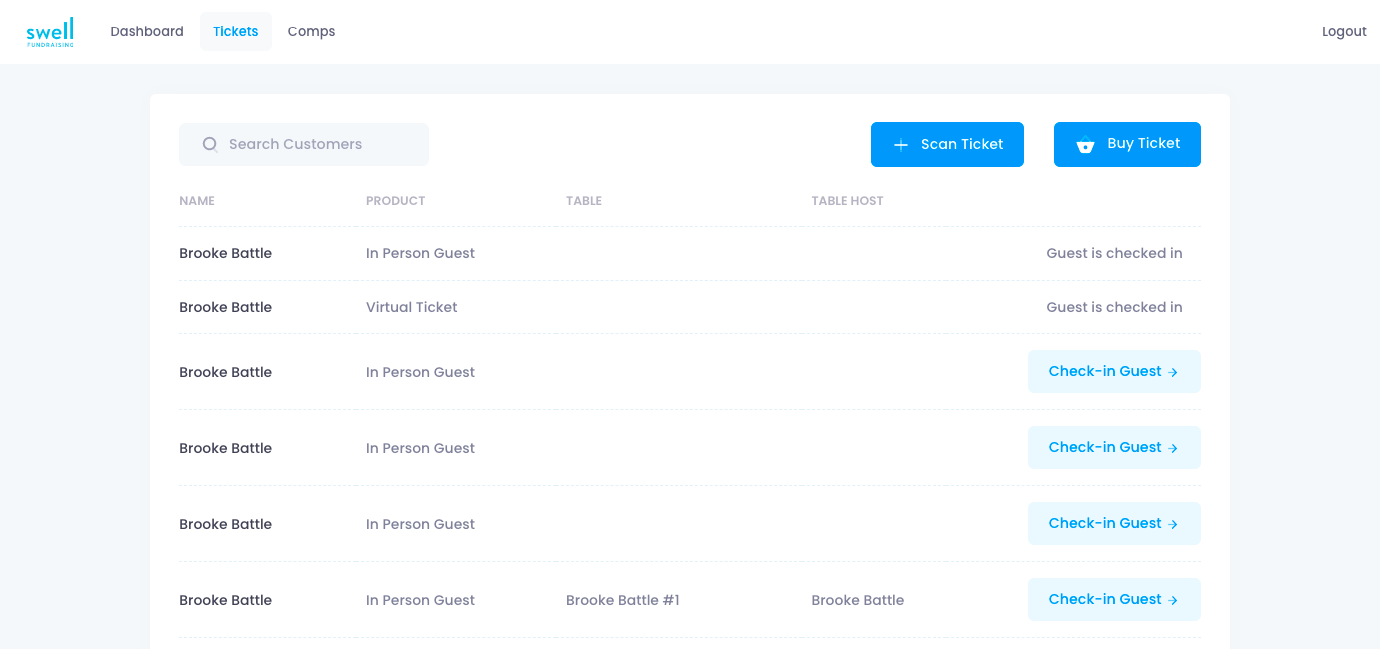
Download this Guide to the Swell Check In App
Clear Entry Lanes
Too often, organizations let the venue entrance define the check-in process and simply setup a table on the ‘long’ wall’. It’s better to define your ideal entry process and set up accordingly.
Set up in a line that is horizontal to the entrance door so that a guest can easily see (a) where to go if there is signage or (b) which volunteer is available to assist. When a check in line is set up parallel to an entrance, guests naturally go to the first volunteer and the line will back up immediately.
Keep Guests Moving Forward
Think of your check-in process in sections.
- Who will walk through quickly (pre-registered guests) and
- Who will slow down a line (non-registered)?
We are BIG fans of separate lines or a table to the side for those who need to register so that the main line can continue to move.
- Do you want to hand them anything - a name tag, drink tickets, program etc.
Create a 2nd step for pick up to move your line quickly.
Lastly, don’t use a check-in table if possible. Keep your volunteers for check-ini standing with tablets so that they can physically help move and guide guests to the tables.
Here’s a setup plan that keeps everyone moving forward.
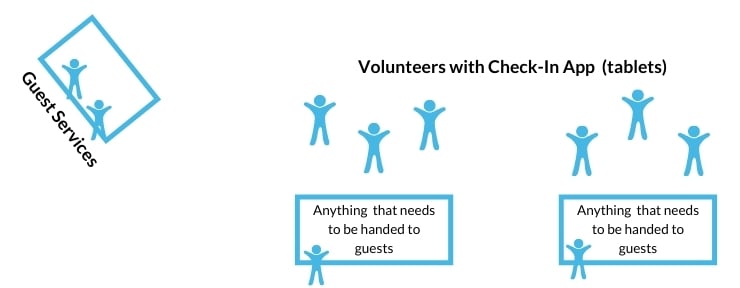
Volunteers need to be positive, problem solvers greeting guests with a smile. I’ve had some surprisingly poor experiences with event volunteers. Choose the right people to set the tone for your event.
Pre-Event Communication
Your guests can be a great help to your entry protocols. We strongly encourage pre-event emails to tell them where to enter and to let them know the process.
Additionally, a pre-event email with their table host name, table number and a map of the room are a really nice way to ensure guests have that information handy. Guests LOVE it.
Bonus: Create a 3rd station with a welcome drink: cocktails, mocktails or just water/tea. This just says welcome and we want you to have a great experience.
The more you fill your guests with a positive experience the better they will respond to your ask. These small details tell your donors the following: (1) We care about your experience. (2) This nonprofit operates at a high level.
Download this Guide to the Swell Check In App
A shameless plug for Swell...
Our pre-registration process combined with the check-in app really help small teams get this right. "Flawless" is the common response we hear from nonprofit clients.